From time to time, you may need to move your entire Kubernetes workload to a new cluster. It might be for testing purposes or to upgrade a major version and sometimes as a disaster recovery.
Recently, I had to migrate one of our customer’s GKE (Google Kubernetes Engine) cluster from Google Cloud Legacy VPC Network to a VPC Native Network and, unfortunately, there is no documented upgrade path for networks in Google Cloud.
After some research, I have found a couple of tools that together made this exercise extremely easy.
Cloning Existing Cluster
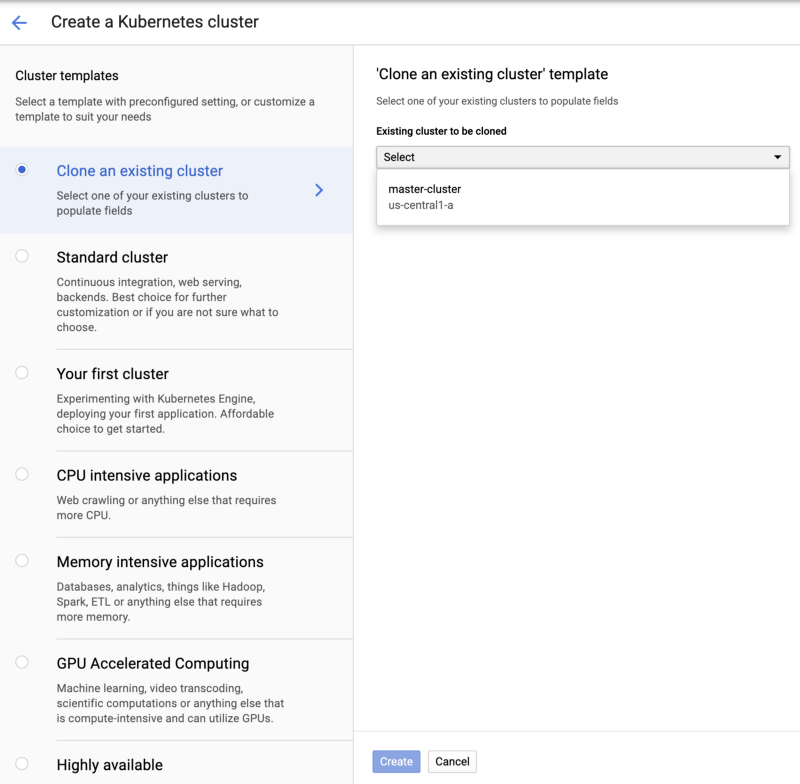
The Google Kubernetes Engine (GKE) has “create a new cluster” feature, allowing to clone an existing cluster:

This will help with copying the cluster configurations, including:
- Zones
- Node Pools and related node pool configuration
- Additional Configuration settings such as node labels and more
You can of course, edit everything before creating the new cluster, but overall this “clone” functionality helps a lot in making sure all nodes and labels are properly configured as easy as two clicks. 🚀
Please bare in mind that it will NOT copy your Kubernetes resources such as deployments, services, ingress, custom resource definitions and therefore you will need another tool to help with migrating of all of these.
Migrating Kubernetes Resources
Now that we have a cloned cluster, I had to migrate all Kubernetes resources such as:
- Workloads
- Services
- Configs
- Secrets
- Storage
- Custom Resource Definitions
- more more more…
Just a quick run of :
$ kubectl api-resources
reveals 74 kinds of Kubernetes resources on my test cluster 😱. Yikes!
Luckily, I was able to find Velero by Heptio (formerly Heptio Ark) to help me with backing up and restoring my Kubernetes cluster resources as well as persistent volumes.
Velero helps you with:
- Backup and restore of your Kubernetes cluster.
- Copy cluster resources from one cluster to another
- Replicate your production environment for development and testing environments. 🎸
Velero looks like a good candidate for replicating the Kubernetes cluster resources to a new cluster, so I decided to give it a try.
Velero Installation
Velero has 2 major components:
- velero-cli — a command-line client that runs locally
- velero deployment — a server that runs on your cluster
before getting started, it’s always a good habit to review the official release of Velero, the latest (stable) release is v0.11.0
I am installing Velero on my GKE cluster, so I was following the instructions here.
The basic installation flow is :
- Install the velero-cli
brew install velero
(you can also download it manually, it’s just one binary)
2. Create a Google Cloud Storage bucket
gsutil mb gs://<gke-cluster-migrate-velero-placeholder-name>
3. Create service account / permissions / policies
See instructions under “Create service account” here
4. Add credentials to your GKE Cluster
See instructions under “Credentials and configuration” here
make sure you replace <YOUR_BUCKET> in the 05-backupstoragelocation.yaml
5. Deploy the velero-server
  kubectl apply -f config/gcp/05-backupstoragelocation.yaml
  kubectl apply -f config/gcp/06-volumesnapshotlocation.yaml
  kubectl apply -f config/gcp/10-deployment.yaml
It’s time for backup!
To backup my entire cluster, I have used:
velero backup create <BACKUP-NAME>When you run velero backup create <BACKUP-NAME>:
- The Velero client makes a call to the Kubernetes API server to create a
Backupobject. - The
BackupControllernotices the newBackupobject and performs validation. - The
BackupControllerbegins the backup process. It collects the data to back up by querying the API server for resources. - The
BackupControllermakes a call to the object storage service – for example, GCS Bucket – to upload the backup file.
Nice!
To see the status of your backup just run:
velero get backups
Migration time
Now that we have a full backup of our original cluster (cluster 1) I had to deploy Velero on the new cluster (cluster 2).
There are a few things I had to attention to:
- On cluster 2, I had to add the
--restore-onlyflag to the server spec in the Velero deployment YAML - I had to make sure the
BackupStorageLocationmatches the one from cluster 1, so that your new Velero server instance points to the same bucket. - Finally, I made sure the Velero resource on cluster 2 are synchronized with the backup files in cloud storage. Note the default sync interval is 1 minute, so make sure to wait before checking.
velero backup describe <BACKUP-NAME>Once I had confirmed the right backup (<BACKUP-NAME>) is now present, I could restore everything with:
velero restore create --from-backup <BACKUP-NAME>Now let’s verify everything on cluster 2:
velero restore getand use the restore name from the previous command:
velero restore describe <RESTORE-NAME-FROM-GET-COMMAND>That’s it!
With GKE “Clone Cluster” and Heptio Velero, I was able to successfully migrate the cluster, including cluster configuration and resources.
These two tools have saved me tons of hours as well as greatly simplified the overall process of mapping, backing up and restoring Kubernetes resources .
Want more stories? Check our blog, or follow Eran on Twitter.


