With the growth of multicloud environments as well as the need for scalable, flexible, and powerful cloud-based data warehouse solutions, Snowflake has emerged as the dominant force in the market, owning more market share than even cloud-native solutions like Amazon Redshift and Google BigQuery, and nearly double that of the nearest third-party competitor.
However, as with any cloud service, effective cost management is critical to maximizing the value of your investment. Without proper monitoring, Snowflake costs can escalate unexpectedly, leading to budget overruns and a lack of financial transparency. In this way, Snowflake cost and usage data is no different than that of your other cloud service providers.
As your business grows and your cloud costs necessarily increase, your data warehousing costs can often account for a significant portion of cloud spending (anywhere from 10-50%), especially for companies with heavy processing and analytics needs. Given this potential to impact your overall IT and operational budgets, the ability to implement effective cost and usage management across all your major cloud cost drivers becomes apparent.
Holistic cost visibility via Snowflake Lens
This need for a single pane of glass has been the driving force behind the release of Snowflake Lens for DoiT Cloud Navigator, an out-of-the-box dashboard that provides advanced analytics and governance capabilities to your Snowflake usage and costs.

Integrating Snowflake costs alongside your other cloud provider costs gives a complete picture of your overall cloud spend. This unified view helps identify where resources are being allocated across various services (compute, storage, networking, and data warehousing), offering deeper insights into the financial impact of your entire cloud infrastructure. Understanding how data warehousing fits into the broader context of cloud spending also enables better decision-making around resource allocation, budget planning, and identifying areas where cost savings can be achieved.
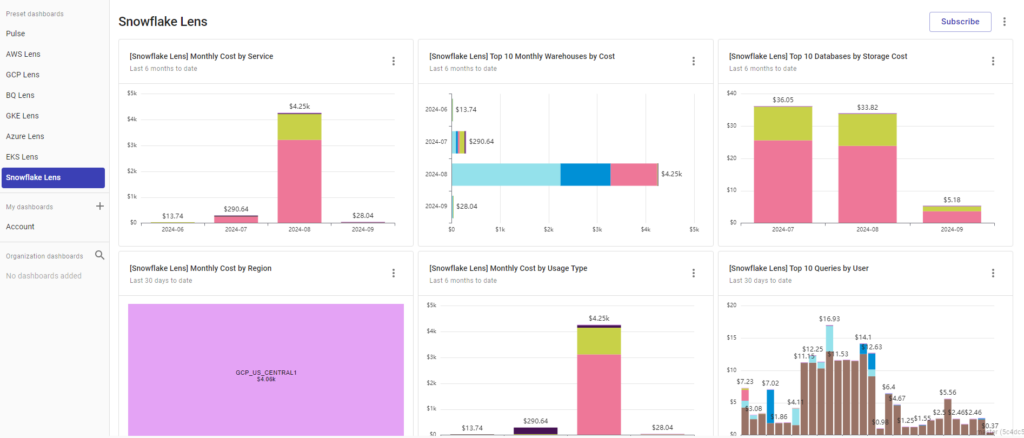
After connecting your Snowflake account to Cloud Navigator – a process that can be done in just a few minutes – and ingesting the data, the dashboard will automatically populate without any additional configuration. There are six report widgets that make up the content of the dashboard:
- Monthly cost by service
- Monthly cost by region
- Monthly warehouses by cost
- Monthly cost by usage type
- Top 10 databases by storage cost
- Top 10 queries by user
Once the Lens is live, each of these widgets can be opened into a full Cloud Analytics report where you can adjust the timeframe, add new filters or groupings, or generate trend analysis to help with forecasting and budgeting.
Once your data is ingested, it also becomes accessible across all other Cloud Navigator features included in your subscription tier, including Dashboards, Attributions, Anomaly Detection, and Alerts. This helps not only to contextualize and monitor your Snowflake costs, but also help ensure that you’ll be notified (either in the console, or via your Slack / email integration) whenever there is a cost spike that falls outside of the expected range.
Optimizing your Snowflake costs
As with any IT or cloud spend, getting the most out of the investment you made in Snowflake is dependent upon ensuring that your costs are in line with what you’ve budgeted, and if not, that their purpose is serving your overall business goals. In other words, it’s not necessarily about always reducing costs, but rather ensuring that the money being spent is not wasted.
That said, as many of the experts on the DoiT Cloud Solve team can tell you, it’s very common to have numerous optimization opportunities when you first start auditing your Snowflake usage. So whether you’re doing it on your own or with the assistance of our in-house services team, there are a few common strategies that you should keep in mind when reviewing these costs.
Compute Savings
- Rightsize Virtual Warehouses
One of the most effective ways to reduce Snowflake compute costs is to ensure that your virtual warehouses are appropriately sized for their workloads. Large warehouses can be more expensive, and in many cases, a smaller warehouse can achieve similar performance results for routine workloads. Therefore, it’s probably best to start small and scale up as needed; begin with smaller warehouse sizes and monitor performance, only scaling up only if there’s a need for faster query execution. Many of our customers find that their workloads can be effectively run in an x-small warehouse the majority of the time, so starting there and vertically scaling from there if needed is ideal.
- Consolidate Virtual Warehouses
Running multiple virtual warehouses for similar workloads can increase costs unnecessarily. By consolidating warehouses, especially for teams or departments with similar data processing needs, you can reduce idle time and make better use of resources. Key strategies include:
-
- Pooling resources: Consolidate smaller, underutilized warehouses into a single larger warehouse that can handle multiple tasks in parallel, improving resource efficiency.
- Auto-scaling: By using a shared virtual warehouse with auto-scaling enabled, Snowflake can automatically adjust resources during peak demand, preventing over-provisioning and reducing costs during idle periods.
- Set Query Guardrails
Long-running or inefficient queries can consume significant compute resources and drive up costs.
-
- Setting query timeouts: Query timeouts can prevent runaway queries from monopolizing warehouse resources. Set query timeout limits to terminate queries that exceed a reasonable execution time, saving compute resources and encouraging users to optimize inefficient queries.
- Auto-suspend & Auto-resume: You might also want to consider implementing the Warehouse Auto-suspend and Auto-resume options, for which the best practice is to set it around 5 minute (or less for busier warehouses). This helps save money by not keeping warehouses running when they’re not in use.
- Optimize Clustering Keys: Using clustering keys in Snowflake can significantly reduce the amount of compute required for queries by improving data access efficiency and reducing the amount of data that needs to be scanned. To maximize the effectiveness of clustering keys, select the columns that are most frequently used in query filters (‘WHERE’ clauses), ‘JOIN’ conditions, or sorting operations. This ensures that Snowflake clusters the data in a way that makes those queries more efficient.
- Refactor and Optimize Queries
You should also be regularly reviewing and optimizing queries to ensure they are designed for performance and cost-efficiency. Using appropriate indexing, avoiding unnecessary data scans, and reducing joins can improve query performance and lower costs.
Storage savings
- Drop Unused Tables and Data
Over time, Snowflake warehouses can accumulate unused tables, outdated data, or unnecessary backups, all of which contribute to increased storage costs. Regularly identifying and dropping unused tables can help reduce costs. A common source of these are staging tables that may have been used for ETL jobs and were never deleted, thus unnecessarily increasing storage costs. You can also automate the removal of these tables after jobs are complete to avoid it happening in the future.
- Optimize Data Compression
Snowflake automatically compresses data to reduce storage requirements, but optimizing how you store data can improve compression efficiency. When doing so, it’s important to choose highly compressible data formats such as Parquet or ORC, which provide better compression than formats like CSV. These formats help reduce the overall data footprint while maintaining performance.
- Optimize Data Retention Settings
Snowflake’s Time Travel and Fail-safe features allow you to access historical data for a certain period, but they also come with storage costs. Tweaking your retention settings can help reduce costs, such as shortening the Time Travel retention period or limiting the Fail-safe retention. While Fail-safe provides a 7-day recovery window for data after Time Travel has expired, this additional storage can be costly. Ensuring that Fail-safe is only used when necessary can avoid some large cost spikes down the road.
- Use Temporary or Transient Tables
Using temporary and transient tables in Snowflake is an effective way to lower storage costs, especially for short-lived data or intermediate results that don’t need to be stored long-term.
-
- Temporary tables are ideal for storing intermediate or session-specific data during ETL processes, complex queries, or data transformations. Since they are only available within the session that created them and are automatically dropped at the end of the session, they help avoid unnecessary long-term storage costs.
- Transient tables are useful for storing data that needs to persist across multiple sessions, but only for a short period of time. Unlike permanent tables, transient tables do not have Fail-safe (Snowflake’s 7-day recovery period), which helps reduce costs. These tables do have Time Travel, but you can set a shorter retention period to minimize storage costs.
Your growing one-stop shop for cloud savings
The release of Snowflake Lens within Cloud Navigator is part of our continuing effort to provide DoiT customers with all of the tools and expertise that they need to effectively manage and control their cloud environment across all of their key cost drivers. Going forward, there will be new service providers and integrations that will allow you to bring all of your relevant IT spend into Cloud Navigator’s single pane of glass, further reducing the amount of friction in your growing FinOps practice.
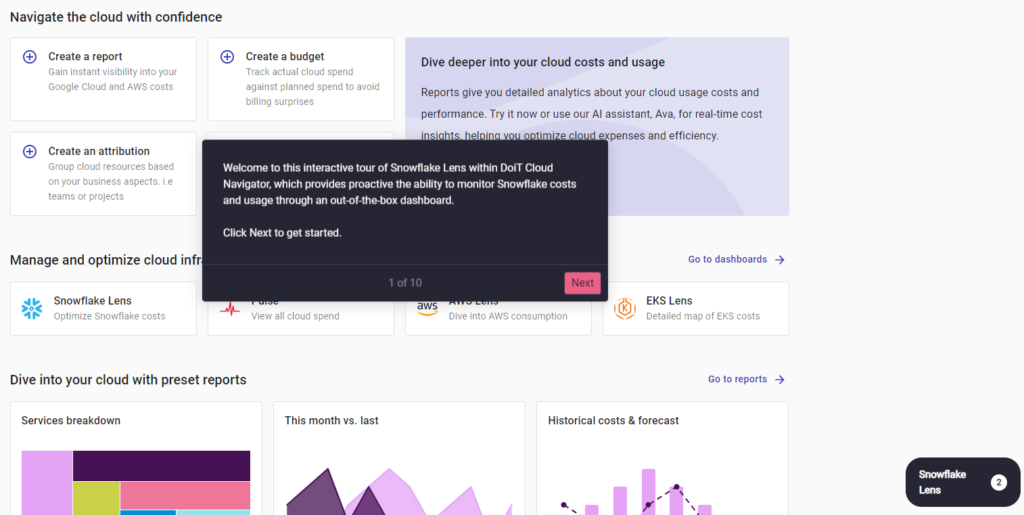
To learn more about Snowflake Lens and how it works, click on the image below to take a comprehensive self-guided tour, or get in touch with a DoiT expert.


