What you need to know when using more than one network interface in Google Cloud
Google Cloud’s Load Balancer with one single global IP and a slew of backend services (VMs, K8s pods, Cloud Functions instances, etc.) is a predominant way to expose your application to the World Wide Web today. Particularly if all you need is a good old HTTP(S). One IP address to rule them all is usually enough.
However, from time to time we can have a special, or call it traditional, setup where you’ll want a VM to accept traffic on multiple IPs. In most cases, it usually would be through TCP protocol, though a good old IP-based HTTP virtual hosting example immediately comes to mind.
The above essentially boils down to “How can I have a GCP VM with multiple IPs?” Searching the web would most likely lead you to “GCP VM with multiple network interfaces” path. This approach works as described — bind one external IP to each of the VMs Network Interface Card (NIC). However, there are several limitations to be aware of:
- Each Network Interface Card (NIC) requires a separate VPC network. Not a problem in itself, but definitely requires some DevOps setup — it’s not only about creating a VPC and defining its IP ranges in a non-overlapping manner, but also about creating FW rules for each VPC.
- You can have up to 8 NICs per VM. It may be enough for your needs but it may be not.
- You CANNOT change the amount of VM NICs after VM creation. If you start with 5 IPs and want to add another one later, you’ll have to recreate the VM.
- The number of VM vCPUs should be at least the sames as number of NICs. This is where it may quickly become expensive for your needs. 1–2 vCPUs can be enough for you to serve all your traffic, but you’ll still have to pay for 8 vCPUs machines if you want 8 IPs.
There is a hack I can share with you — create an 8 vCPU VM with 8 NICs then stop the VM, downscale the machine type, and then start it up. Use caution since GCP may close this loophole at any time.
Forwarding rules
The cheaper and more straightforward way to go is the forwarding rules. All of the GCP networking is software-defined so your VM can’t just grab IPs and advertise them through ARP responses — there is not much ARP going on really. It’s either localhost or the default gateway for the rest. Even traffic to your “neighbor” VM in the same VPC flows through the default gateway.
me@my-vm:~$ ip route show
default via 10.128.0.1 dev ens4
10.128.0.1 dev ens4 scope link
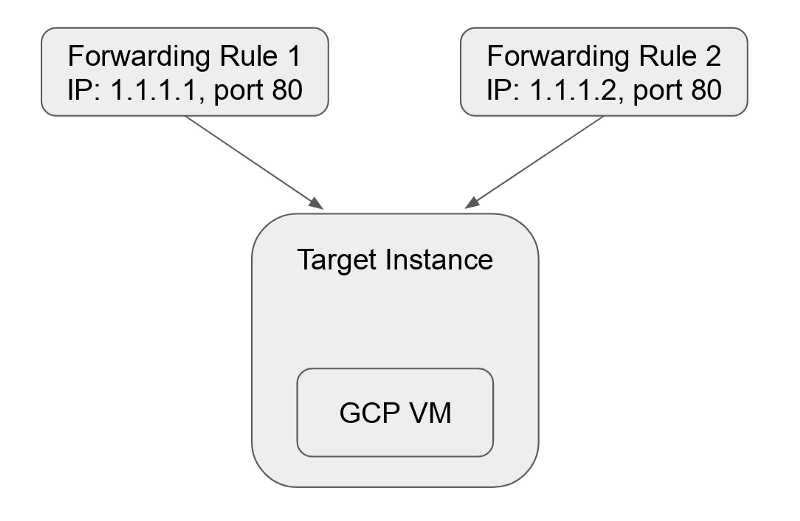
So we need to “explain” to GCP that we want more IPs to accept traffic, and the way to “explain” it is through forwarding rules.
A forwarding rule in GCP is very flexible. It can listen to any combination of IP, ports, protocols, HTTP hosts & paths, and forward matching traffic to a target which can be a VM, a pool of VMs, a Cloud Storage bucket, a Cloud Function, a K8s service, etc.
Forwarding rules cost money. More on that later.
In our case we only need the simplest form — listen on tcp:address:port and forward all traffic to a single target instance.

GCP docs have a very good and very long article on how to set this up. They call this approach Protocol Forwarding. There is basically no support for it in GCP UI console. If you want to set this up in your non-default region, you need to be peculiar in noting the right regions and zones for each of the commands (let me know in the comments if you prefer more details on this).
Fortunately, there is a simpler way to do it in the UI.
Let's allocate several IPs to begin:

NOTE: Make sure your IPs are regional and reside in the same region as your target VM.
The UI warns you that unused static external IPs incur higher pricing than the used ones, but we’ll rectify it in a moment.
Next, create a VM — let’s call it “au-vm” in australia-southeast1 region. Make sure to click “Allow HTTP traffic” or configure the firewall rules to allow the port in question over TCP.
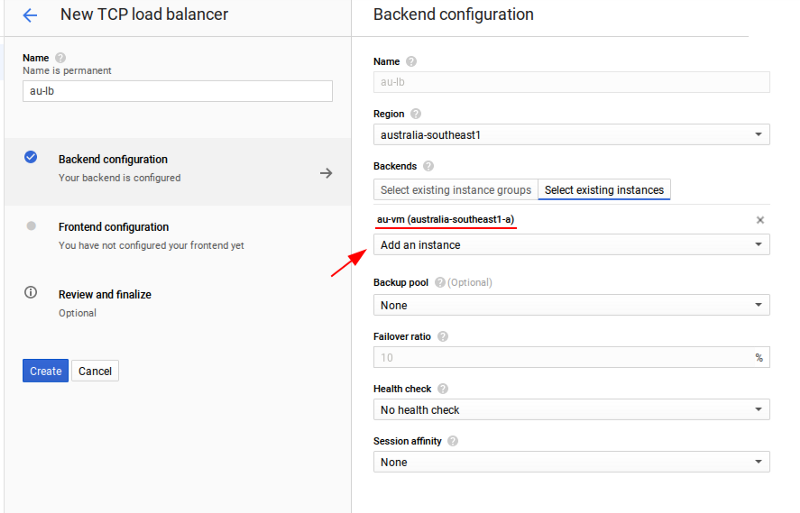
Now, let’s proceed to the forwarding rules. In the Network Services menu select Load Balancing and then start configuration for the new TCP load balancer. The default values of “From Internet to my VMs”, “Single region only”, and “Target Pool or Target Instance” are exactly what we need.
Give your load balancer a name and then, in the Backend configuration section, select your existing au-vm instance.

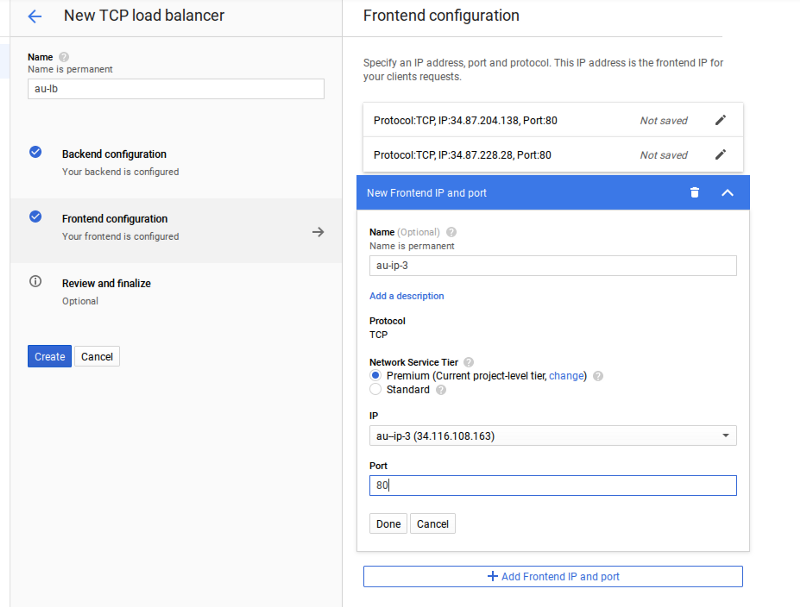
We’re done with the target part. Now click “Frontend configuration” to work on the “listening” part and add all of the IPs you have reserved.

Click “Create” — and that’s it! Please allow it a couple of minutes to come online and from now on your VM can accept traffic from all of the three IPs above. If it doesn’t work, make sure you have firewall rules in place to allow the required ports.
You can edit your load balancer to add and remove IPs at any time.
Processes on your VM can even bind to the desired target IP address even though this address does not appear to be configured on any Linux network interface (as per ip address show). In this example, the following will work:
nc -s 34.87.204.138 -l -p 80
The secret behind this magic is GCP daemons running on your machine and configuring Linux routes to accept packets for the destination addresses in question:
me@au-vm:~$ ip route show table all
...
local 34.87.204.138 dev ens4 table local proto 66 scope host
local 34.87.228.28 dev ens4 table local proto 66 scope host
local 34.116.108.163 dev ens4 table local proto 66 scope host
...
The money talk
Forwarding rules work great and feel more like a natural answer to the task. However, they are not free.
Google will charge you a flat rate of $0.025/hour for the 1st five rules — i.e you pay the same total of $0.025/hour regardless of whether you have 1 or 5. For any additional forwarding rules, the price is $0.01/hour. Thus, to have 10 IPs for a VM for a whole month would cost you $55/month, just for the forwarding rules.
Unfortunately, that’s not all. Not so long ago GCP started to charge for external IPs, even for the used ones (and it’s regardless of whether IPs are used by VMs or forwarding rules). Their price of $0.004/h per IP may look negligible but it’s $0.004*730h =$2.92/month and multiplied by 10 IPs in our case brings the total cost of having 10 IPs routed to our VM to:
$55 + $29.2 ~= $85/month — just for IPs before we pay for the VM
Whether this is expensive or not, I’ll leave it for you to decide :-)
Thanks for reading! To stay connected, follow us on the DoiT Engineering Blog, DoiT Linkedin Channel, and DoiT Twitter Channel. To explore career opportunities, visit https://careers.doit.com.

